You’ve probably all heard about the “Flipped Classroom” and “Flipped Learning”.
But what about about “Flipped Practice”?
Just last week one of my students who is in year 6 at school (11 years old) and about to complete his Grade 4 piano was given a chord chart for the Jazz band at school. Even though I’m pretty confident with contemporary, popular and jazz music, I would have had to put a bit of practice in to play the score. I wanted to make it easier for him as we haven’t looked at anything other than 7th chords, so 9th, 11th and 13th chords were a bit of a mystery for him.
To help with his practise, I recorded myself playing the chords so that he could copy it at home. This type of “flipped” learning is what kids are experiencing at school and in many areas these days.
Related: How to set up and use playlists for students on YouTube
My student held the iPad while I recorded the chords for him to take home and learn. The student is quite committed to playing in the Jazz Band, so he will go home and spend quite a bit of time working on this activity. It didn’t take up lots of lesson time which was important as we needed to work on his exam repertoire.
This literally took the time it takes to watch this video – it’s so quick and easy and he did it on his own device. I kept a copy to show you:
I have quite a few other examples of how you can assist your students at home and not even be there! Take some of my examples and re-work them for your own students.
I am the Director of Forte School of Music a network of music schools with over 4,000 students in Australia. We have a very specific method that incorporates philosophies of Orff, Dalcroze, Kodaly and Suzuki. You’ll hear about these wonderful philosophies in the upcoming podcasts that Tim is presenting.
One of my (and Forte’s) foundation principles is to start children from a young age and engage children’ s parents in the learning. You can imagine a 4 or 5 year old can’t possibly remember what happens in lessons and, funnily enough, most of the parents who accompany their children aren’t that much better!
We use backing accompaniment tracks so students can play along. After 30 years of teaching experience I often found parents couldn’t remember how the songs “go” and wouldn’t practice with the CD which we felt was the vital part of the process (making the learning musical and relevant for the students).
The solution was to recreate all the Forte whole courses on YouTube so that both parents and children could use our “Practice Buddy” at home. You can check out the “Practice Buddy” for yourself here.
When it comes to recording videos, if you haven’t done it before, I know it can be a bit scary and like me, you’ll learn from your mistakes along the way. You’ll hear the sound quality isn’t that great in the earlier books. That’s because I hadn’t learnt how to record sound properly – but that was extremely easy to learn and I was able to fix most of the problems in the later books. I’ll go back and re-record all the earlier books at some stage.
At the end of this post I’ve written a guide on how you can do these sorts of videos yourself.
I also use this type of video teaching regularly for exam students for both pieces and for scales. Here’s my Grade 1 Scale set that I get my students to practice with:
[youtube https://www.youtube.com/watch?v=videoseries?list=PLX0ISScVHjHq0umKZ9yBqrmDrE3tgCX-5]
Here’s the E minor example from my Grade 2 set you won’t believe that scales could be so much fun to play along with.
All the backing tracks are from the Scale Backing Tracks, can be found at www.forteschoolofmusic.bandcamp.com you can play these and try them out to see if you like them.
Feel free to give the video links to your students as well!
Related: The age old question…how do we make piano scales fun and relevant?
I try to record pieces and scales for my students at three speeds: medium, fast and slow (in that order). There’s a very specific reason I do this.
Our brains remember the first and last things that we do. It’s called primacy and recency. So using this method will assist in more effective learning. We’ve all heard about the benefits of slow practice; incorporating YouTube into a student’s practice regime can enforce slow practice.
Check out the videos I’ve done for some popular AMEB Grade 1 & 2 pieces: Groovy Movie (by Elissa Milne – below) and Hedwig’s Theme from the Grade 2 syllabus.
You can see this one required a little more editing which was done very easily in the free iMovie software that comes with any Mac computer.
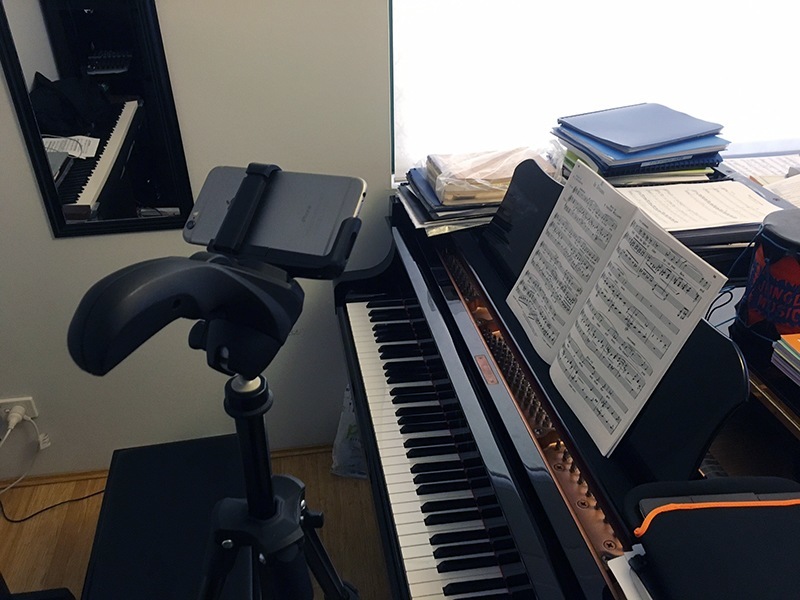
You could do it all with an iPhone or iPad or Android device. The iPhone has a pretty good built in microphone and will give reasonable results. If you would like to improve the sound quality of your videos you could try a good quality microphone. These are not expensive usually $100 or less and are available online or from most large electrical retailers.
If you have a digital piano you could take a line from the ear phone jack of your piano into your iPhone using an iRig adaptor. Obviously if you have an acoustic piano – you’ll just need the microphone.
[Check out my full list of Resources for more links and recommendations for the recording equipment that I use in my studio – Tim T.]
To record the pieces I used a small mixing desk that plugged into my camera. You don’t need such a complicated set up, a simple iPhone or other smart device will be fine. The trick is positioning the camera above your fingers, at a height that you can see your whole piano (or the parts you need).
I suggest a cheap tripod and then use a selfie-stick attachment, which will fit on top of your tripod, the one I use was about $25.00. Here’s an example of one you could use on Amazon.
Once you’ve recorded your video, you can upload it to YouTube. Here’s an easy video to watch to learn how to do that
You can also upload directly from your device by downloading the YouTube APP for iOS or Android.
I’d love to hear your ideas about great ways to use YouTube to both engage students in practice and to save time during lessons.


Terry A Smith says:
Good article. I use a good webcam hanging from a microphone stand pointed to my keyboard for a clear view.
One question: If I want to record pieces from someone else’s curriculum (Piano Pronto, etc.), what are the copyright issues and considerations?